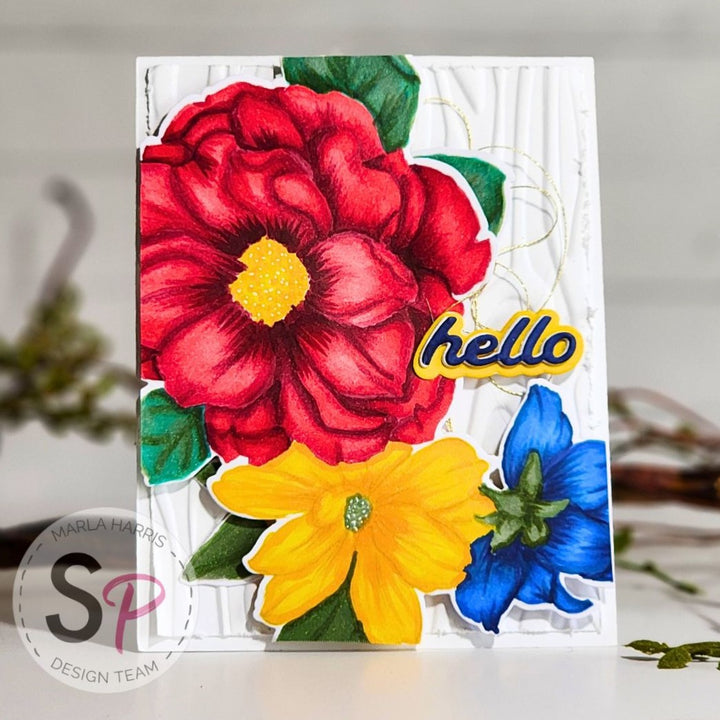

Hello friends, Marla here with another card share. Today's design features products from Altenew's Build-A-Garden collection. I must have been hiding under a rock because I had no idea these beautiful bargain bundles existed. If you love florals with layering stencils, the "Blooming Delights" bundle is amazing. The bundle includes a beautiful floral cluster stamp, layering stencils and a die at an amazing price point. Let's get into the card.

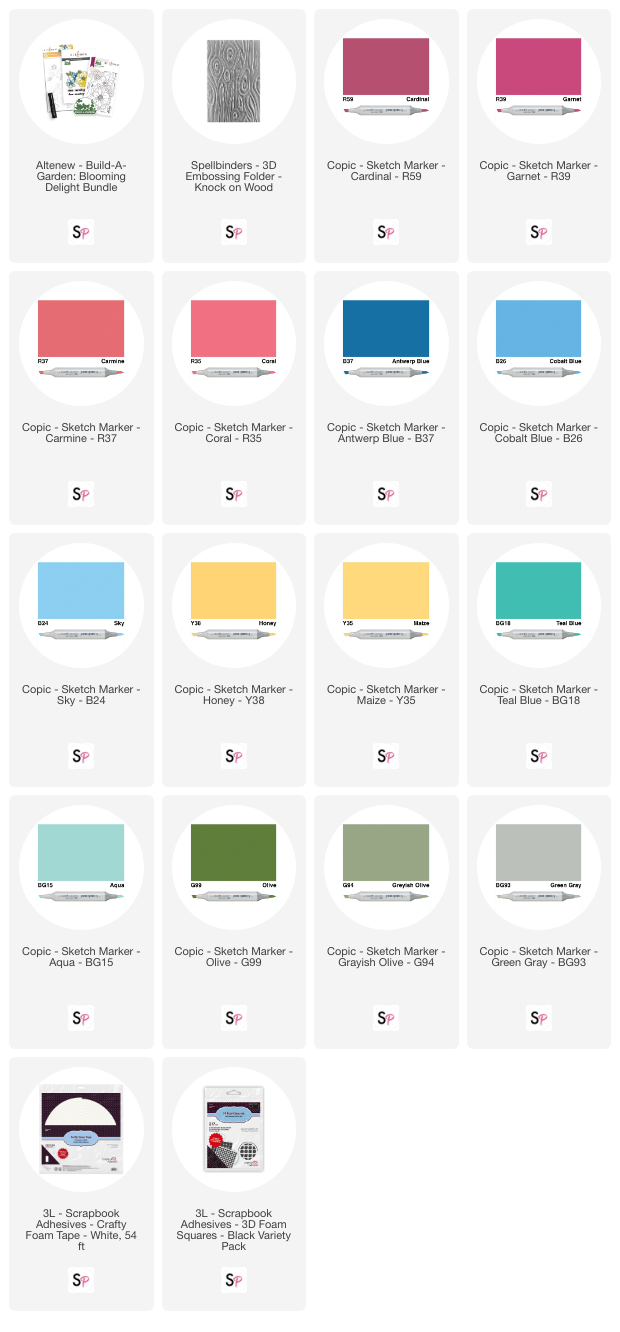
I started by stamping my image onto Copic friendly cardstock with a light gray ink. I chose the light gray because I wanted to color my images with my Copic markers and wanted a no line appearance. I plan to use the layering stencils on a second card, that will be shared on the Scrapbook Pal Instagram, account later this month. As you can see, I chose a very bold color combination of red, blue and yellow for these beautiful flowers. Here is the list of markers I used: R59, 39, 37, 35 B37,26,24, Y38,35,BG18,15 (to underpaint the large leaves), G99,94 and 93. After I finished coloring the flowers, I cut out the image using the coordinating die.

Because I had a bold color palette, I wanted a simple background with a touch of texture. I created a layering panel with Spellbinders "Knock on Wood" 3D embossing folder using white cardstock. I knew that by keeping the layer behind my florals white, the flowers would really stand out on the card. Before embossing, I cut the panel down to 4" x 5.25" and used my scissors to distress the edges. After running it through my die cutting machine, I added foam tape to the back and attached it to a white A2 top folding card base.

Next, I used the "Hello" dies to cut both the sentiment and the shadow. I added color using my Copic markers. For additional dimension, I die cut the sentiment three more times from white cardstock and glued them all together for dimension. I offset the stack of white sentiments with the blue one for more interest. Then I adhered the stacked sentiments to the shadow.

To complete the card, I added foam tape to the back of my flowers and small foam squares to the right side of my sentiment so it would stay flush on my card. After attaching the pieces to my embossed panel, I cut off the areas that were hanging off the edge of my card. I added a couple of the extra cut leaves behind my flowers for added interest. Next, I used a white gel pen to add some stippled texture to the center of my flowers. Finally, I added gold thread behind my flowers and sentiment.
Thanks for stopping by today. Until next time... Marla
Supplies: