
Instructions:
1. I used my Copic Markers to color up the following images: (7) Fish, (1) Shark Fin, and (3) Shark from the Lawn Fawn Duh-Nuh Stamp Set, and (2) large sailboats from the Lawn Fawn Smooth Sailing set, and cut them out.
2. The first piece that I die cut was the main body piece itself from the Lawn Fawn Flippin’ Awesome in Light Blue cardstock. I die cut (1) Lawn Fawn Stitched Rectangle Die, (4) stitched squares from the Flippin’ Awesome Die Set, and (1) Rectangle from the Flippin’ Awesome Add-On set out of White cardstock. I also die cut another (4) stitched squares from Flippin’ Awesome and 1 rectangle from Flippin’ Awesome Add-On from Lawn Fawn Spiffy Speckles Paper. I then die cut the Scalloped Rectangle and Rounded Pull-Tab from Flippin’ Awesome Add-On in Navy Cardstock. Finally, I die cut 4 squares from Flippin’ Awesome in Peacock Cardstock. I used this same Peacock Cardstock and cut an A2-sized panel (4.25” x 5.5”)
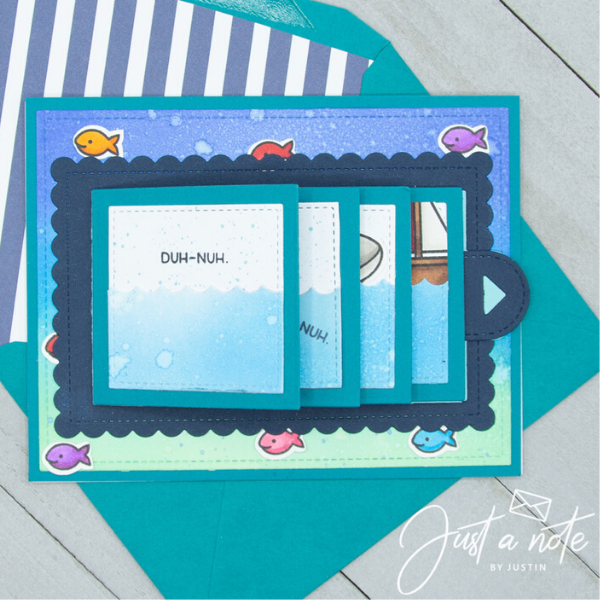
3. I took my white stitched rectangle die and used Ranger Ink Distress Oxide to blend an ocean ombré. From top to bottom, the colors are Blueprint Sketch, Salty Ocean & Cracked Pistachio. I then spritzed the background with water, let it dry completely, and adhered it to my Peacock A2 panel, which gave it a thin frame. Then, I adhered my (7) fish around the edge of the panel.
4. I took my (4) white cardstock stitched squares and (1) white cardstock rectangle, and blended them with Ranger Ink Distress Oxide Ink. From top to bottom, the colors are Tumbled Glass and Salty Ocean. To get a wave effect, I carefully lined up the scalloped edge of the Scalloped Rectangle from the Flippin’ Awesome Add-On. I then adhered each wave piece to it’s corresponding Spiffy Speckles square and rectangle, but not adhering the top edge of the water yet so I could still tuck in my pieces to create dimension
5. For my first square, I wanted it to just look like water, so I stamped the “Duh-Nuh” sentiment from the Duh-Nuh stamp set in black ink. I adhered this layer to a Peacock Square.
6. For my second square, I wanted the shark’s fin to come out of the water, so I adhered my shark fin behind the wave piece, and stamped the “Duh-Nuh” sentiment from the Duh-Nuh stamp set in black ink. I adhered this layer to a Peacock Square.
7. For my third square, I positioned a full shark to come out of the water so you could see him better. I cut off the excess that was hanging over the edge of this square. I stamped the “Duh-Nuh” sentiment from the Duh-Nuh stamp set in black ink. I adhered this layer to a Peacock Square.
8. For my fourth and final square, I had the shark raised out of the water more, with part of the sale boat on the right side of the square. I trimmed off the parts of the pieces that went over the edge of the square.I stamped the “Duh-Nuh” sentiment from the Duh-Nuh stamp set in black ink. I adhered this layer to a Peacock Square.
9. For my rectangle, I wanted a scene that was post-shark-attack. I tucked my shark to make it look like they were going back under water, cut my sailboat in half, tucked the sides on each end of the shark, and adhered them down. I finished off this panel with the sentiment “You Are Jawsome” from the Duh-Nuh Stamp Set in Black Ink.
10. To get my Flippin’ Awesome body piece ready, I used my bone folder to crease every fold from each side (the 2 adhering flaps, along with each of the creases near where you place the square pieces). I folded over the large left piece so that it went entirely under the die, and popped back up on the right side of the die (this is the part you pull). I then folded each of the 2 adhering flaps over it, ran a Tape Runner over the adhering flaps ONLY, and positioned my Flippin’ Awesome piece onto my Navy Scalloped Rectangle from the Flippin’ Awesome Add-On. Then, starting from the rightmost flap, I began adhering my squares in reverse order from right to left (4, 3, 2, 1). This ensured that my first scene would be on top. To finish my Flippin’ Awesome effect, I pulled the tab to make sure everything worked, adhered my final scene rectangle on the long part of the pull-piece, and adhered the stitched rounded pull-tab.
11. To finish my card, I adhered my navy scalloped rectangle, which now holds my Flippin’ Awesome piece, to my A2-Panel, and then adhered my card to an A2 Card base!
Instagram- @justanotebyjustin
Blog- www.justanotebyjustin.com
List of Products Used:
Lawn Fawn Lawn Cuts - Flippin’ Awesome - LF2043
Lawn Fawn Lawn Cuts - Flippin’ Awesome Add On - LF2044
Lawn Fawn Clear Stamps - Duh-nuh - LF1419
Lawn Fawn Clear Stamps - Smooth Sailing - LF1965
Lawn Fawn Petite Paper Pack - Spiffy Speckles - LF1868
Tim Holtz Distress Oxide Ink Tumbled Glass - TDO-56287
Tim Holtz Distress Oxide Ink Cracked Pistachio - TDO-55891

