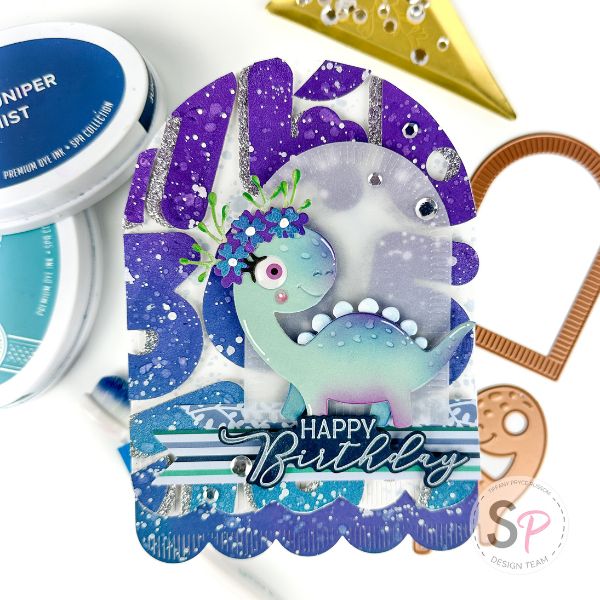

Happy weekend, friends! Tiffany here with a fun, shaped card featuring new products from Spellbinders. As soon as I saw this cute dino, I knew I wanted it in my stash. I think it makes a perfect card for kids (or dinosaur loving adults!). I had fun putting this one together so I hope you're inspired to try something similar or that you pick up something new to apply to your next make.

To start, I created an ink blended panel with my gel press. My gel plate is ~8.5 x 11 so it gives me a nice, large surface to play with. I used my Catherine Pooler inks on the gel plate - Royal Treatment, Juniper Mist, and Daydream. I used the full size pads, but I think the minis would work well too. I applied each color in lines with a small amount of space separating each color. I used my brayer to roll the ink on the gel plate and blend the colors together. I had a scrap piece of copy paper on the side to roll off any excess ink. I used a half sheet of 100lb paper to pull from the gel plate. I added three or four layers of pulls on top of each other so I got a deeper, more saturated ink color.
After letting my panel dry, I used the Spellbinders Birthday Balloons to die cut from the panel. I also die cut each number balloon from silver glitter fun foam and adhered the layers together. I added the numbers to a background I made using the Spellbinders Make a Wish Arch Labels. I used my long scissors to trim any overhanging numbers. I added one more arch die cut with ink blending in the same colors beneath for an extra detail. As is common with my cards, I added splatters all over too with white paint, water, and diluted ink.

I used the Spellbinders Birthday Dinosaur to die cut and assemble the adorable dinosaur. I swiped Catherine Pooler Hot Tub ink on a panel of white cardstock and used that as the base from my dinosaur. I used scraps from my gel plate panel for the flowers and branches. I added touches of ink blending with a mini blending brush and touches of copic markers. For the eyes, I used the Monster Eyes enamel stickers. I like that there are different colors and sizes for the eyes so you can change the look and expression of your critters.

To help separate the dinosaur from the background, I used a smaller die in Make a Wish Arch Labels to die cut an arch from vellum. I popped up the dino with foam tape on top of the vellum and used where the dinosaur was overlapping to add adhesive behind the vellum.

I had some scrap patterned paper that matched so I added a couple strips to my project. I used small scissors to hand-trim each strip of patterned paper into a banner. I love mixing patterns, and I think it helps add some visual interest.

The sentiment is from a batch of Betterpress sentiments I created for another project. I used the Spellbinders You are Everything Sentiments, Press Plate & Die combo. I pressed white pigment ink onto navy cardstock.
To create a folded card, I die cut another large arch and scored about 1/4th inch from the top. I added glue along the folded bit and adhered behind the panel. Inside the card, I stamped a dinosaur related sentiment from Monster Birthday Sentiments. For a final detail, I added some sparkling sequins to the card front.
Thanks so much for stopping by today. I hope you have a great day!

Supplies:
Comment
This is so adorable. Love the colors selection.